My First Kit (with pictures!)
I figure I'll start my blog at where I started. I was always interested in living history, but knew relatively little about it, other than it being expensive and exclusive. Me and Traci (my lovely wife and fellow reenactor / living historian) live in southern Kentucky, right near the Cumberland River where there was a somewhat famous Civil War battle- The Battle of Mill Springs. The battle reenactment takes place about once every 10 years or so, and is a major event for the area. Traci had been to the first one many moons ago, and insisted we go to this one. I agreed, and we both had a great time. We would continue to patronize the events the Mill Springs groups would put on, but never really thought about participating other than the occasional comment of "It'd be neat to do that" sort of thing.
Fast forward a few years and we caught wind of a Winter Trade Days at Fort Boonesborough, which is about an hour and a half up the road from us. We thought it'd be fun to go check it out, as Traci is kin to Daniel Boone and I had been to the fort a long time ago and enjoyed it. We went, had a good time, and asked some folks there how to get involved. They were super friendly and gave us the "Just get some clothes and show up" response that was helpful and also slightly overwhelming. We asked nearly every person there with a booth or trade blanket and got a lot of good information, but we finally found someone who worked at the fort (Thanks Amanda!) who offered us the loaner clothes collection if we came to the next event in the spring.
We mulled it over for a while and found Townsends on Youtube, watched a bunch of their 'what it takes to a reenactor' and we gathered up enough courage to give it a go. We got there, Amanda found us immediately and whisked us away to the blockhouse with the old clothes. Traci found her some stuff that was too big but still worked; I however, am a 'big ole boy' being tall and just big, it's hard to find anything that fit me. We ended up finding a ragged shirt and made me some leggings and miraculously a pair of large moccasins. I looked an absolute mess, but I felt cool and had a hell of a good time. I was determined to come to the next event way better dressed and kitted out. And I did.
Bit of background- Me and Traci make a lot of stuff, we have experience and expertise enough we can literally make anything we need to survive. Modern stuff not so much, but we fit right in in the 18th century, and that was another one of the excitements of reenacting we enjoyed. Traci was in charge of making the clothes, and I was in charge of making everything else. I will not go into how and what Traci made, except that everything she makes is a miracle to me. She made me my first duds, and I'm eternally grateful for it. (And still use most of them)
We decided to use historically accurate materials from the get-go so we wouldn't be wasting our time, money, and efforts. I had been learning to tan hides using the 'brain tan buckskinning' method. I have also been a weaver for 15 years now, and I took up blacksmithing, so the first thing I wanted to make was a bag from scratch. Let me introduce you to my Deer Hide Possibles/Haversack Bag.
This bag I made with my very first brain tanned deer hide. I sewed it together using linen string, and the strap I wove from linen on one of my smaller looms. The metal rings are forged copper I hammered out and patina'ed, and the attachments were copied from a musket military sling attachment. I like this way of attaching things because A) It's period correct and B) You can switch the strap out if you need to. The button is a filed down antler base. I made an 18th century leather dressing to make it weatherproof and rubbed it down several times with it. I used this to hold all my stuff when I started out, but now it has become a catch all sack that usually carries food and random stuff when I go trekking. It has held up great, but the strap is thin so it rolls up which doesn't distribute weight very well. I've only had to repair the ring attachments on the bag and considering the mileage I've put on this thing I'm pretty pleased.
I needed a belt and a belt bag to help store some things, so I went and bought a new belt with a buckle I could alter and took some cow hide I tanned and made these. The belt I sanded all the polish off and I hand ground and filed the buckle to the shape of some period examples I liked. The belt bag is entirely my design, minus the closure and that it's a belt bag. The leather on this is very thick and hardy which works out well for the abuse it sustains. It's waterproofed with the same dressing I used on the deer bag and I can attest it works very well. I use this bag to hide my modern stuff like my keys and phone. When trekking, I put my modern compass in there as well to have quick access. I have had to repair it several times but I suspect it's because it's not as flexible as the deer hide bag and makes stress points.
Any Frontiersman worth his salt has a big ole knife, and as I couldn't afford one, I made me one. I had been learning how to blacksmith and admittedly I was (and still am) not great at it, but I spent a whole lot of time cutting metal and forging this blade with hand tools. I filed it with hand files, and as a result the angle is pretty steep which doesn't make a great surface to hold an edge. I will have to regrind it in the future if I want a good, sharp, serviceable knife. I used a scrap of some sort of low carbon steel, it's very strong and I got the temper correct on it. I carved the scales out of curly maple, but roughed it up to make it look more used. The sheath is more of my first deer hide, with a thicker leather insert to protect the blade. The overall design is inspired by an 18th century trade/scalping knife, but I've found out recently that this is probably too thick for your typical scalper. I actually do not use this knife anymore because it's not sharp enough for me, I have another that some other fellow made that I use to skin and cut up game animals and such.
Fast forward a few years and we caught wind of a Winter Trade Days at Fort Boonesborough, which is about an hour and a half up the road from us. We thought it'd be fun to go check it out, as Traci is kin to Daniel Boone and I had been to the fort a long time ago and enjoyed it. We went, had a good time, and asked some folks there how to get involved. They were super friendly and gave us the "Just get some clothes and show up" response that was helpful and also slightly overwhelming. We asked nearly every person there with a booth or trade blanket and got a lot of good information, but we finally found someone who worked at the fort (Thanks Amanda!) who offered us the loaner clothes collection if we came to the next event in the spring.
We mulled it over for a while and found Townsends on Youtube, watched a bunch of their 'what it takes to a reenactor' and we gathered up enough courage to give it a go. We got there, Amanda found us immediately and whisked us away to the blockhouse with the old clothes. Traci found her some stuff that was too big but still worked; I however, am a 'big ole boy' being tall and just big, it's hard to find anything that fit me. We ended up finding a ragged shirt and made me some leggings and miraculously a pair of large moccasins. I looked an absolute mess, but I felt cool and had a hell of a good time. I was determined to come to the next event way better dressed and kitted out. And I did.
Bit of background- Me and Traci make a lot of stuff, we have experience and expertise enough we can literally make anything we need to survive. Modern stuff not so much, but we fit right in in the 18th century, and that was another one of the excitements of reenacting we enjoyed. Traci was in charge of making the clothes, and I was in charge of making everything else. I will not go into how and what Traci made, except that everything she makes is a miracle to me. She made me my first duds, and I'm eternally grateful for it. (And still use most of them)
We decided to use historically accurate materials from the get-go so we wouldn't be wasting our time, money, and efforts. I had been learning to tan hides using the 'brain tan buckskinning' method. I have also been a weaver for 15 years now, and I took up blacksmithing, so the first thing I wanted to make was a bag from scratch. Let me introduce you to my Deer Hide Possibles/Haversack Bag.
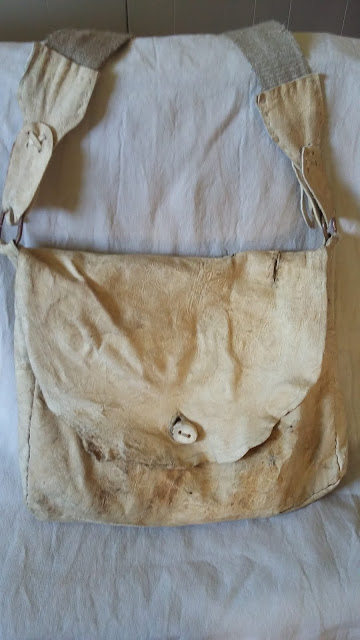 |
| Deer Hide Bag, Braintan Deer leather, copper, linen, and antler |
 |
| Buckskinned Cow Hide Belt bag and Altered Belt |
I needed a belt and a belt bag to help store some things, so I went and bought a new belt with a buckle I could alter and took some cow hide I tanned and made these. The belt I sanded all the polish off and I hand ground and filed the buckle to the shape of some period examples I liked. The belt bag is entirely my design, minus the closure and that it's a belt bag. The leather on this is very thick and hardy which works out well for the abuse it sustains. It's waterproofed with the same dressing I used on the deer bag and I can attest it works very well. I use this bag to hide my modern stuff like my keys and phone. When trekking, I put my modern compass in there as well to have quick access. I have had to repair it several times but I suspect it's because it's not as flexible as the deer hide bag and makes stress points.
 |
| Scalping Knife, low carbon steel, maple, brass and buckskin sheath |
Any Frontiersman worth his salt has a big ole knife, and as I couldn't afford one, I made me one. I had been learning how to blacksmith and admittedly I was (and still am) not great at it, but I spent a whole lot of time cutting metal and forging this blade with hand tools. I filed it with hand files, and as a result the angle is pretty steep which doesn't make a great surface to hold an edge. I will have to regrind it in the future if I want a good, sharp, serviceable knife. I used a scrap of some sort of low carbon steel, it's very strong and I got the temper correct on it. I carved the scales out of curly maple, but roughed it up to make it look more used. The sheath is more of my first deer hide, with a thicker leather insert to protect the blade. The overall design is inspired by an 18th century trade/scalping knife, but I've found out recently that this is probably too thick for your typical scalper. I actually do not use this knife anymore because it's not sharp enough for me, I have another that some other fellow made that I use to skin and cut up game animals and such.
 |
| Gourd canteen with hemp netting and cotton canvas strap. |
It gets really hot in Kentucky in the summer time, and I was really concerned with how I was going to carry around water. It just so happened that I had been working on making a gourd canteen for other reasons but never finished it. I grabbed this beauty and finished it up, made a net and strap and sealed it with beeswax on the inside so the water wouldn't taste like Satan's asshole. The stopper is made out of Kentucky cane, the net is hemp, and the strap is cotton canvas with linen thread. This little bugger held nearly a gallon of water, kept it cold, and carried extremely well because of the wide thick strap. I say held because I knocked a hole in it after it dropped from a place I shouldn't have put it. Gourds are brittle, and I tried to repair this one with spruce sap and beeswax, but it didn't hold as the damage was too great. It's now a nice little display piece and I've made a bigger gourd since. (Also remember to thoroughly dry these guys out after you get done using them or they'll mold and become unstable!)
Barring a few other things I neglected to take pictures of, such as a linen sash, cotton wrapper leggings, and a really cheap felt(ish) hat I dolled up, we were ready to go! Unfortunately I don't have any pictures of our first time out in our own clothes, but I do have a picture of us at the last event we went to that season, the Siege of Boonesborough, where we were at our peak that year-
 |
| Me and Traci our first year reenacting. |
That was a whiles back, and from here on out I'll probably break stuff up into smaller bits. I hope this helps ya'll a little bit and may this provide a basis on where I'm coming from. I'll tell you this as advice to folks just starting out- You really don't need much to start reenacting in this period. Find you some clothes, show up, and ask folks if you can help or engage in some activities at the place you're at. Once you figure out what interests you, then go make/buy some stuff to make it more fun. Half the fun is the adventure of it all, and I hope to see some of you all out there at a Fort, Event, or even in the woods sometime soon!


Comments
Post a Comment